Bazel C++ 빌드 해보기
원문 : https://docs.bazel.build/versions/master/tutorial/cpp.html
준비하기
- Bazel Install
- Sample project 다운로드 (아래 명령)
git clone https://github.com/bazelbuild/examples/
빌드하기
Workspace 설정
워크스페이스는 Bazel이 빌드할 소스코드와 출력물을 저장하기 위한 폴더이며 다음 파일을 포함한다.
- WORKSPACE File - 워크스페이스의 디렉토리와 내부파일을 정의한다. 프로젝트 디렉토리 구조에서 루트에 위치
- BUILD file - 하나 또는 여러개 파일 존재. 프로젝트의 각 부분을 어떻게 필드할지 정의한다. (빌드파일을 가지는 폴더는 하나의 패키지가 된다.)
BUILD File
BUILD File은 몇가지 지시유형을 내부에 포함한다. 그 첫번째는 Build rule 이며 결과를 얻기 위한 빌드방법을 정의한다.
빌드파일에서의 빌드룰의 인스턴스를 Target이라고 부른다. Target은 소스셋과 종속관계, 또는 다른 Target을 지정한다.
#빌드파일 사례
cc_binary(
    name = "hello-world",
    srcs = ["hello-world.cc"],
)
여기서 cc_binary가 빌드룰이며, 종속관계가 없는 hello-world.cc 라는 소스파일을 이용하여 실행파일을 빌드하는 룰을 정의하고 있다. name 은 필수속성이다.
프로젝트 빌드
샘플프로젝트의 cpp-tutorial/stage1 폴더로 이동하여 다음 명령을 실행한다.
여기서 //main: 은 빌드파일의 위치(workspace 루트로부터 상대경로)를 나타내고 hello-world는 빌드파일내에 정의된 target의 이름이다.
$ bazel build //main:hello-world
..........
INFO: Analysed target //main:hello-world (8 packages loaded).
INFO: Found 1 target...
Target //main:hello-world up-to-date:
  bazel-bin/main/hello-world
INFO: Elapsed time: 2.810s, Critical Path: 0.30s
INFO: Build completed successfully, 6 total actions
빌드결과는 workspace 루트 아래의 bazel-bin 디렉토리에 (심볼릭 링크로) 생성된다.
$ bazel build //main:hello-world
..........
INFO: Analysed target //main:hello-world (8 packages loaded).
INFO: Found 1 target...
Target //main:hello-world up-to-date:
  bazel-bin/main/hello-world
INFO: Elapsed time: 2.810s, Critical Path: 0.30s
INFO: Build completed successfully, 6 total actions
종속관계 그래프 보기
성공적인 빌드를 위한 종속관계는 빌드파일에 명시되며 Bazel은 이를 이용하여 프로젝트의 종속관계 트리를 생성하고 증분 빌드를 실행하게 된다.
프로젝트 종속관계를 가시화하기 위해 아래 코드를 workspace root에서 실행해보자.
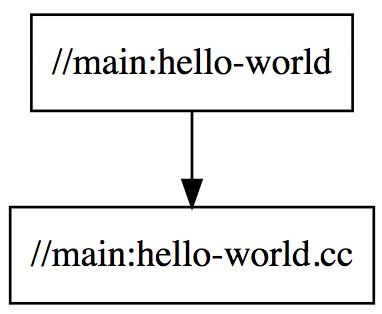
…/examples/cpp-tutorial/stage1$ bazel query --nohost_deps --noimplicit_deps 'deps(//main:hello-world)' --output graph
digraph mygraph {
  node [shape=box];
"//main:hello-world"
"//main:hello-world" -> "//main:hello-world.cc"
"//main:hello-world.cc"
}
위 명령은 //main:hello-world 에 대한 모든 종속관계(host와 암시적 종속은 제외)를 그래프로 표시하라는 명령이다.
위 결과를 Graphviz(http://www.webgraphviz.com/) 붙여넣어보면 아래 그림이 생성된다.
여러 타겟을 가지는 빌드
증분빌드를 위해 여러개의 target과 패키지를 가지는 보다 큰 프로젝트로 확장해보자.
다음은 샘플프로젝트 cpp-tutorial/stage2/main 디렉토리에 있는 두개의 target을 가지는 프로젝트 예제이다.
cc_library(
    name = "hello-greet",
    srcs = ["hello-greet.cc"],
    hdrs = ["hello-greet.h"],
)

cc_binary(
    name = "hello-world",
    srcs = ["hello-world.cc"],
    deps = [
        ":hello-greet",
    ],
)
이번 빌드파일에서는 먼저 Bazel에 내장된 cc_library라는 룰을 사용하여 hello-greet 이라는 라이브러리를 먼저 빌드하고 그 후 hello-world라는 바이너리를 빌드하게 되어있다.
그리고 Hello-world target에 정의된 deps 속성은 hello-world 바이너리를 빌드하기 위해서는 hello-greet 라이브러리가 필요하다는 사실을 알려주고 있다.
빌드를 위해 cpp-tutorial/stage2 디렉토리로 이동한 후 다음 명령을 실행한다.
**…/cpp-tutorial/stage2**$ bazel build //main:hello-world
...........
INFO: Analysed target //main:hello-world (8 packages loaded).
INFO: Found 1 target...
Target //main:hello-world up-to-date:
  bazel-bin/main/hello-world
INFO: Elapsed time: 2.737s, Critical Path: 0.34s
INFO: Build completed successfully, 7 total actions
**cpp-tutorial/stage2**$ bazel-bin/main/hello-world
Hello world
Wed Dec 27 11:07:33 2017
이제 hello-greet.cc 파일을 수정하면 해당 변경사항만 다시 컴파일할 것이다.
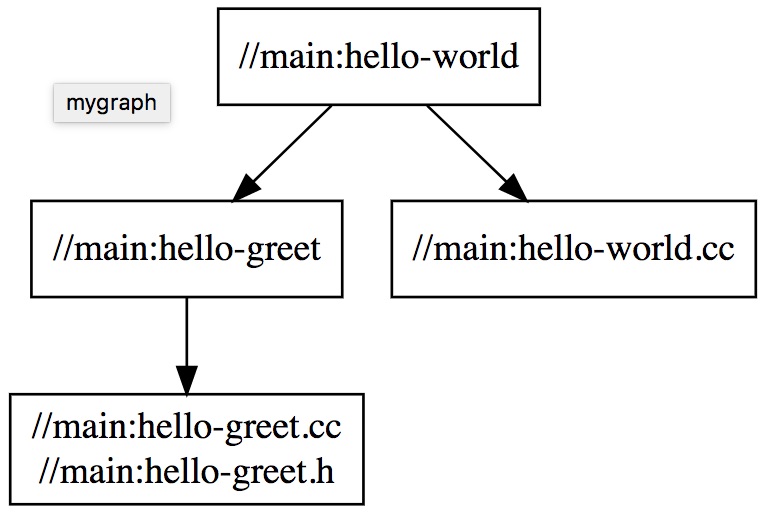
종속관계 그래프도 바뀌었다.
cpp-tutorial/stage2$ bazel query --nohost_deps --noimplicit_deps 'deps(//main:hello-world)' --output graph
digraph mygraph {
  node [shape=box];
"//main:hello-world"
"//main:hello-world" -> "//main:hello-greet"
"//main:hello-world" -> "//main:hello-world.cc"
"//main:hello-world.cc"
"//main:hello-greet"
"//main:hello-greet" -> "//main:hello-greet.cc\n//main:hello-greet.h"
"//main:hello-greet.cc\n//main:hello-greet.h"
}
여러 패키지를 가지는 빌드
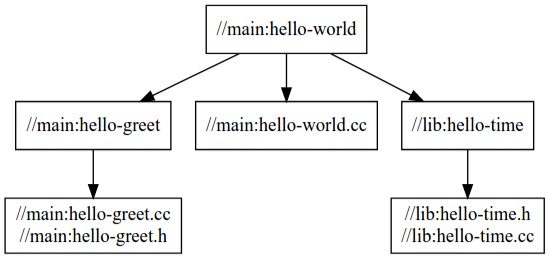
cpp-tutorial/stage3 디렉토리의 구성은 아래와 같다.
└──stage3
   ├── main
   │   ├── BUILD
   │   ├── hello-world.cc
   │   ├── hello-greet.cc
   │   └── hello-greet.h
   ├── lib
   │   ├── BUILD
   │   ├── hello-time.cc
   │   └── hello-time.h
   └── WORKSPACE
이번 프로젝트는 lib과 main이라는 두개의 sub 디렉토리를 가지면서 디렉토리별로 각각 BUILD 파일을 가지고 있다.
lib 디렉토리의 빌드파일을 먼저 보자.
cc_library(
    name = "hello-time",
    srcs = ["hello-time.cc"],
    hdrs = ["hello-time.h"],
    visibility = ["//main:__pkg__"],
)
main 빌드파일은 아래와 같다.
cc_library(
    name = "hello-greet",
    srcs = ["hello-greet.cc"],
    hdrs = ["hello-greet.h"],
)

cc_binary(
    name = "hello-world",
    srcs = ["hello-world.cc"],
    deps = [
        ":hello-greet",
        "//lib:hello-time",
    ],
)
deps 속성에서 확인할 수 있듯 main 패키지의 hello-world target은 lib 패키지에 있는 hello-time target에 종속된다.
여기서 lib 빌드파일의 hello-time targe을 정의할 때 visibility속성을 이용하여 main/BUILD의 타겟에 대한 가시성을 명시적으로 정의한 점에 주목하자.
Bazel에서는 디폴트로 동일한 빌드파일에서만 target간 가시성을 허용한다.
세번째 사례를 빌드해보자.
…/cpp-tutorial/stage3$ bazel build //main:hello-world
..........
INFO: Analysed target //main:hello-world (9 packages loaded).
INFO: Found 1 target...
Target //main:hello-world up-to-date:
  bazel-bin/main/hello-world
INFO: Elapsed time: 2.940s, Critical Path: 0.26s
INFO: Build completed successfully, 8 total actions

…/cpp-tutorial/stage3$ bazel-bin/main/hello-world
Hello world
Wed Dec 27 11:30:18 2017
타겟 라벨링
Bazel에서 타겟을 라벨링하는 문법은 아래와 같다. (예: //main:hello-world or //lib:hello-time)
//path/to/package:target-name
룰 타겟일 경우, path/to/package는 BUILD파일이 저장된 디렉토리경로이고 target-name은 빌드파일에 name 속성을 이용하여 정의한 target이름이다.
파일 타겟일 경우, path/to/package 는 패키지 루트의 경로이고 target-name 은 타겟파일의 이름(전체경로를 포함한)이다.
동일한 패키지내에서는 패키지 경로를 제외하고 //:target-name 로 접근할 수 있다.
동일한 빌드파일 내에서는 //를 제외하고 :target-name 만으로 접근할 수 있다.